Setting up a GTest Hello World Project on Windows with MSYS2, MinGW-w64, and vcpkg
Welcome to my updated demo of a Google Test “Hello, World!” project on Windows using MSYS2, MinGW-w64, and vcpkg. In this guide, we’ll walk through:
- Adjusting environment variable priority in Windows so the correct
g++is picked up. - Installing and configuring MSYS2, MinGW-w64, and vcpkg.
- Dealing with common issues such as “Unable to find a valid Visual Studio instance” and how to ensure we’re using the
x64-mingw-dynamictriplet. - Building and running a minimal Google Test example.
1. Prioritize the Correct Compiler in Windows
When you have multiple versions of g++ on your system (from MSYS2, Cygwin, or elsewhere), it’s important that MSYS2’s MinGW-w64 compiler is picked up first. You can check which ones are visible in PATH by opening Command Prompt (not MSYS2) and running:
C:\Users\Gordon> where g++
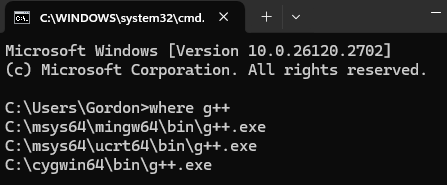
If you see multiple paths, reorder your Windows environment variables so that:
C:\msys64\mingw64\bin
appears before any others in the PATH. This ensures that when you run g++, Windows uses the MinGW-w64 version first.
- Open “System Properties” → “Advanced” → “Environment Variables.”
- Edit the
Pathvariable and moveC:\msys64\mingw64\binto the top. - Apply changes and restart any open terminals so the updated PATH is recognized.
2. Installing MSYS2 and MinGW-w64
-
Install MSYS2
Download MSYS2 and run through the official installer. - Open MSYS2 and update packages with:
pacman -Syuu(Follow on-screen prompts, then reopen MSYS2 if necessary.)
- Install Required Tools (in MSYS2 MingW64 shell):
pacman -S --needed git base-devel mingw-w64-x86_64-toolchain \ mingw-w64-x86_64-clang mingw-w64-x86_64-cmake - Create a Symlink for
make
By default, MinGW’s make is namedmingw32-make.exe. To ease usage:cd /mingw64/bin ln -s mingw32-make.exe make.exe
3. Bootstrapping vcpkg in MSYS2
3.1 Clone vcpkg
In the MingW64 terminal:
cd /mingw64/bin
git clone https://github.com/microsoft/vcpkg.git
cd vcpkg
3.2 Run the Bootstrap Script
./bootstrap-vcpkg.bat

4. Common Installation Pitfall
If you try installing GTest before specifying your triplet, you may see:
error: in triplet x64-windows: Unable to find a valid Visual Studio instance
Could not locate a complete Visual Studio instance

This happens because vcpkg defaults to the x64-windows triplet, expecting Visual Studio.
5. Setting the Correct Triplet
To use MinGW-w64, export these environment variables first:
export VCPKG_DEFAULT_TRIPLET=x64-mingw-dynamic
export VCPKG_DEFAULT_HOST_TRIPLET=x64-mingw-dynamic
Then install GTest again:
./vcpkg install gtest

6. Integrate vcpkg (Optional)
Run:
./vcpkg integrate install

This instructs you to use:
-DCMAKE_TOOLCHAIN_FILE=C:/msys64/mingw64/bin/vcpkg/scripts/buildsystems/vcpkg.cmake
in your CMake commands.
7. Verifying Installed Packages
Check what’s installed with:
./vcpkg list

You should see gtest:x64-mingw-dynamic listed.
8. Creating a Minimal GTest Project
Here’s a simple folder structure for a “Hello, World!” project:
gtest_MinGW64_vscode_win_helloworld/
├── CMakeLists.txt
├── src/
│   └── main.cpp
└── tests/
    └── test_helloworld.cpp
CMakeLists.txt
cmake_minimum_required(VERSION 3.10)
project(GTestHelloWorld CXX)

# Option A: Hard-code the vcpkg toolchain file here
#set(CMAKE_TOOLCHAIN_FILE "C:/msys64/mingw64/bin/vcpkg/scripts/buildsystems/vcpkg.cmake" CACHE STRING "" FORCE)

# Option B: Omit the line above and specify via command line

set(CMAKE_CXX_STANDARD 17)
set(CMAKE_CXX_STANDARD_REQUIRED True)

add_executable(helloworld src/main.cpp)

find_package(GTest CONFIG REQUIRED)

add_executable(tests tests/test_helloworld.cpp)
target_link_libraries(tests PRIVATE GTest::gtest GTest::gtest_main)

enable_testing()
add_test(NAME MyHelloWorldTest COMMAND tests)
src/main.cpp
#include <iostream>

int main() {
    std::cout << "Hello, World!" << std::endl;
    return 0;
}
tests/test_helloworld.cpp
#include <gtest/gtest.h>

// Sample function to test
int add(int a, int b) {
    return a + b;
}

TEST(HelloWorldTest, TestAdd) {
    EXPECT_EQ(add(2, 2), 4);
    EXPECT_EQ(add(-1, 1), 0);
}

TEST(HelloWorldTest, AnotherTest) {
    EXPECT_TRUE(true);
}
9. Building and Running Tests
- Create a
builddirectory and go inside it:cd gtest_MinGW64_vscode_win_helloworld mkdir build && cd build - Invoke CMake using the MinGW Makefiles generator and the vcpkg toolchain:
cmake -G "MinGW Makefiles" \ -DCMAKE_TOOLCHAIN_FILE=C:/msys64/mingw64/bin/vcpkg/scripts/buildsystems/vcpkg.cmake \ -DVCPKG_TARGET_TRIPLET=x64-mingw-dynamic \ .. - Build the project:
cmake --build .This produces
helloworld.exeandtests.exe. - Run the tests:
./testsYou should see Google Test’s output indicating 2 passing tests.
Conclusion
By prioritizing the correct g++ in your Windows PATH and setting the x64-mingw-dynamic triplet, you can avoid the Visual Studio dependency and run GTest projects with MSYS2 + MinGW-w64. The vcpkg package manager simplifies installing libraries like GTest, and you’re free to expand this skeleton into a more advanced project.
If you have any questions or run into issues, feel free to reach out. Happy coding!
Comments